Pluralsight: Angular Getting Started
References
- https://blogs.msmvps.com/deborahk/angular-2-getting-started-problem-solver/
- https://github.com/DeborahK/Angular-GettingStarted
- https://www.typescriptlang.org/play/
- Course to learn TypeScript: TypeScript Fundamentals
- Course to learn VS Code: Visual Studio Code
- Course to learn more about HTTP: Angular: Reactive Forms
- Course to learn more about RxJS: RxJS in Angular: Reactive Development
- Course to learn advanced HTTP: Angular HTTP Communication
Introduction
- Application made up of lots of components and possibly services
- Component = template (UI) + class (code = properties and methods) + metadata (defined with a decorator = function)
- Modules allow organising components into cohesive blocks
- Each application has a least one: Root Module
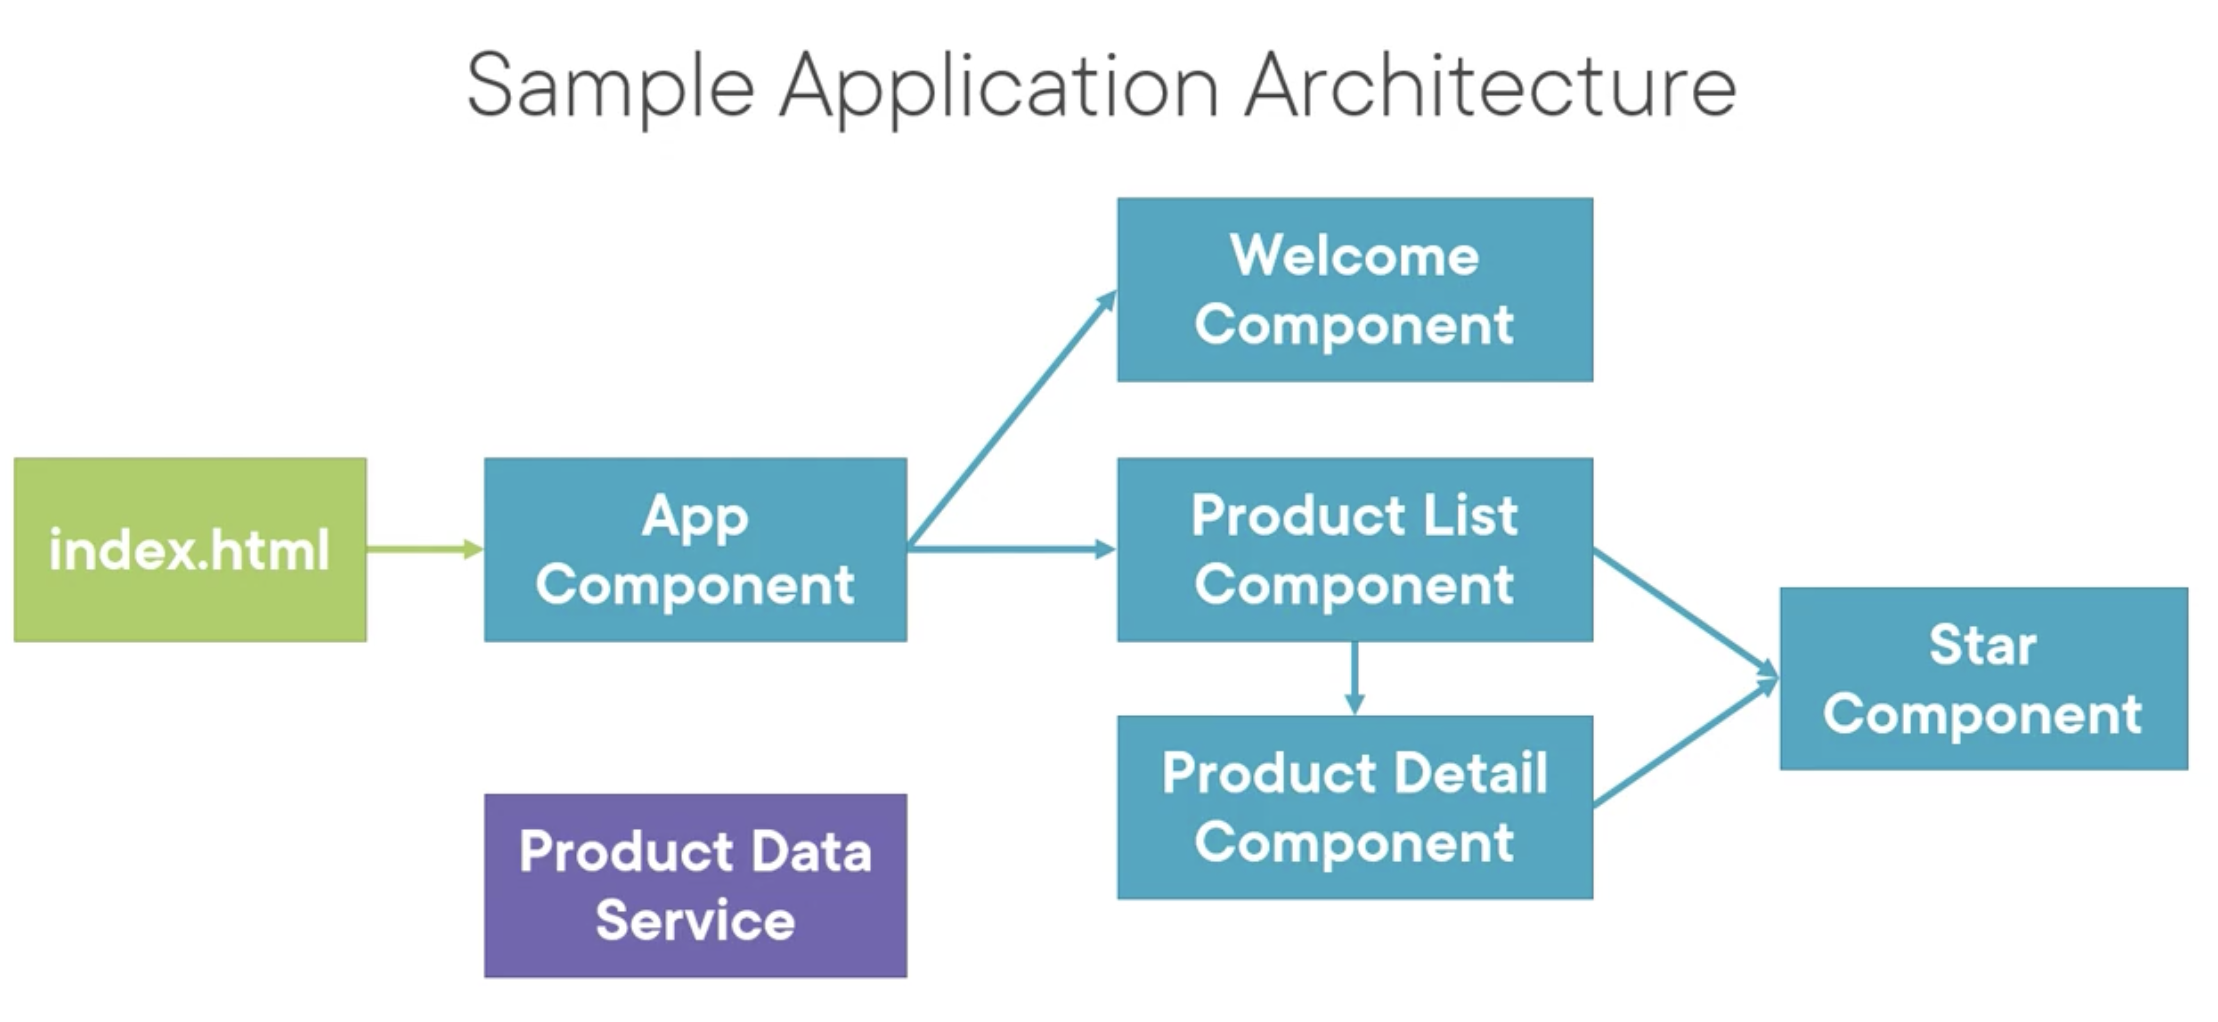
Components in the example application
- Welcome page -> Welcome Component
- Product list page -> Product List Component
- Star ratings (reusable) -> nestable Star Component
- Product detail page -> Product Detail Component
- App Component to tie things together (the root component)
- Product Data Service to get any data
- index.html
First Things First
- Install node (latest LTS)
- Install npm
- Download sample code
npm installnpm start
References
- Angular CLI - https://github.com/angular/angular-cli
- Starter files - https://github.com/deborahk/angular-gettingstarted
Building and running the initial application
src- all source code files in a directory namedsrcsrc/app- source code specific to the application; subfolder for each major feature in the application- Other files under
srcare setup and configuration files = boilerplate files npm installto install all dependencies inpackage.json(creates a new foldernode_modules- ensure in .gitignore)@angular/cliis a dev dependency so a version was installed locally for the project, used by the start scripts- Install the cli globally using
npm i -g @angular/cli
Modules
ES 2015 Modules
- ES 2015 defines a module as a file and a file as a module
- Angular has an implementation of ES 2015 Modules, but ALSO has Angular Modules
- ES 2015 Modules:
- product.ts -
export class Product { ... }- this file becomes a module and exports the classProduct - product-list.ts -
import { Product } from './product'- this file also becomes a module since it imports theProductmodule
- product.ts -
- Note -
product.tswill be transpiled toproduct.js(but anyway the file extension is not included when importing modules)
Angular Modules
- Has at least one Root Angular Module (by convention called app module)
- When adding more features - can be grouped into seperate Feature Modules
- Can also defined Shared or Common Modules
- Each Component is declared in and belongs to ONE and ONLY ONE Module
| ES Modules | Angular Modules |
|---|---|
| Code files that import or export something | Code files that organise the application into cohesive blocks of functionality |
| Organise our code files | Organise our application |
| Modularise our code | Modularise our application |
| Promote code reuse | Promote application boundaries |
Introduction to Components
What is a component? Creating a component class. Defining metadata with a decorator. Importing dependencies. Bootstrap the app component.
- Component = template + class + metadata
- Convention is to name components ending in
Componentand for the root component to be calledAppComponent exportenables other files / classes to use this component (and thus makes it an ES module)- A class becomes an Angular Component when it is given component metadata using an
@Componentdecorator function (similar to attributes in other languages):
@Component({
  selector: 'pm-root', // Directive Name (simply a custom HTML tag)
  template: `<div><h1></h1></div>`
})
This a function (hence ()) which is passed an anonymous object (hence {})
- All external modules or classes need to be
imported prior to using (part of ES 2015) - allows usingexported members from external modules - Angular is modular: @angular/core; @angular/animate; @angular/common; @angular/router - anything needed from angular needs to be imported (see all available libraries at https://www.npmjs.com/search?q=@angular)
- Bootstrap the root app component:
index.htmlhosts the application - the file contains the root component’s directive e.g.<pm-root></pm-root>. As soon as the page has finished loading the template’s HTML is inserted between these tags- The HTML file knows about the custom directive by checking with an Angular Module. The root angular module declares the root component and is also able to bootstrap the startup component (usually named
AppComponent) - Example root angular module:
import { NgModule } from "@angular/core";
import { BrowserModule } from "@angular/platform-browser";
import { AppComponent } from "./app-component";

@NgModule({
  imports: [BrowserModule], // arrays
  declarations: [AppComponent],
  bootstrap: [AppComponent],
})
export class AppModule {}- Use PascalCasing for classes
- Use camelCasing for properties and methods
Templates, Interpolation and Directives
npm install bootstrap font-awesome- Import bootstrap and font-awesome css files into the main
styles.css - Binding co-ordinates communication between the component’s class and its template and often involves passing data. Provide values from the class to the template for display; the template raises events to pass user actions or user entered values back to the class.
- Interpolation - one type of binding - one way binding - from class -> template - can use concatenation, calculations, call methods etc
- Note - quotes not needed on HTML attributes when using interpolation
- The syntax between
{{ }}is called a template expression
for … of vs for … in
- ES 2015 has both loops
for .. ofiterates over iterable objects e.g. objects in an arrayfor .. initerates over the properties of an object e.g. indexes in an array (TIP for … index)
Hence *ngFor uses for .. of
Data Binding & Pipes
Interpolation
- ``
Property Binding
- One way binding from class -> template
<img [src]='product.imageUrl'>- set the property of an element to the value of a template expression- Binding target is always enclosed in
[] - Binding source is always enclosed in
'' - Alternative using interpolation:
<img src=> - Can also use for styles e.g.
[style.width.px]="width" // width is a Number variable- see https://angular.io/guide/class-binding#binding-to-a-single-style
Event Binding
- One way binding from template -> class
- Source binding event is enclosed in
() - Binding target is often a class method and enclosed in
'' - See: https://developer.mozilla.org/docs/Web/Events for a list of DOM events
Two-way Binding
- Use the
ngModeldirective which is enclosed in both[]and()i.e.[(ngModel)](a Banana in a Box) <input type='text' [(ngModel)]='filterText'/>- Specify the binding source of the class in quotes
ngModelis part ofFormsModuleso needs to be imported in the appropriate component
Pipes
| uppercase| currency | lowercase- Pipes with parameters:
| currency:'USD':'symbol':'1.2-2'
More on Components
Interfaces
- Used to define datatypes
- ES5 and ES2015 do not support interfaces - but TypeScript does, so only provide compile time support
- Many prefix interface names with
Ie.g.IProduct - Can also create a class to implement that interface but ONLY IF the class provides some functionality we want to use throughout the application e.g. the interface defines a method
Component styles
- Use the
stylesorstyleUrlsproperties on the@Componentdecorator (both array types so can specify multiple styles, or multiple files)
Component lifecycle
- Create -> Render -> Create and render children -> Process changes (when the databound properties change) -> Destroy it before moving its template from the DOM
- Lifecycle hooks can be used to tap into these steps
OnInit(method isngOnInit) for component initialization after Angular has initialised the databound properties e.g. retrieve data from backend serviceOnChangesperform actions after Angular sets databound input properties (input properties coming up)OnDestroyfor cleanup
- There is an interface for each lifecycle hook which the Component class can implement as required
- Declare the class implements the interface
- Import it
- Write the method
- Note that since JavaScript does not support interfaces - they are only checked at compile time and aren’t strictly necessary - nevertheless it is good practice.
Custom Pipes
@Pipe({
  name: 'convertToSpaces'
})
export class ConvertToSpacesPipe implements PipeTransform {
  transform(value: string, character: string): string {
    return value.replace(character, ' ');
  }
}
- New file e.g.
convert-to-spaces.pipein the shared folder - Import
PipeandPipeTransformfrom@anglar/core - Add the pipe class name to the
declarationslist in the appropriate Angular module as well as the necessary import statement to the location of the code file
Filtering
- Could use a pipe - but Angular doesn’t provide such functionality “they perform poorly and prevent agressive minification” (https://angular.io/guide/pipes#no-filter-pipe)
- Recommendation is to move sorting and filtering logic into the component
- Could use event binding on key presses etc - but an EASIER way is to change the existing
listFilterpublic property into a getter and setter backed by a private property - In all other respects this works exactly as the existing property - however now we can add extra logic into the getters or setters e.g. update an seperate
filteredProductsarray when the value is changed e.g.this.filteredProducts = list.listFilter ? this.performFilter(this.listFilter) : this.products; - Also a good idea to set default values in the constructor e.g.
this.listFilter = 'cart'; this.filteredProducts = this.products;
performFilter(filterBy: string): IProduct[] {
  filterBy = filterBy.ToLocaleLowerCase();
  return this.products.filter((product: IProduct) =>
  product.name.ToLocaleLowerCase().indexOf(filterBy) !== -1);
}
See: https://developer.mozilla.org/en-US/docs/Web/JavaScript/Reference/Global_Objects/Array/filter
Building Nested Components
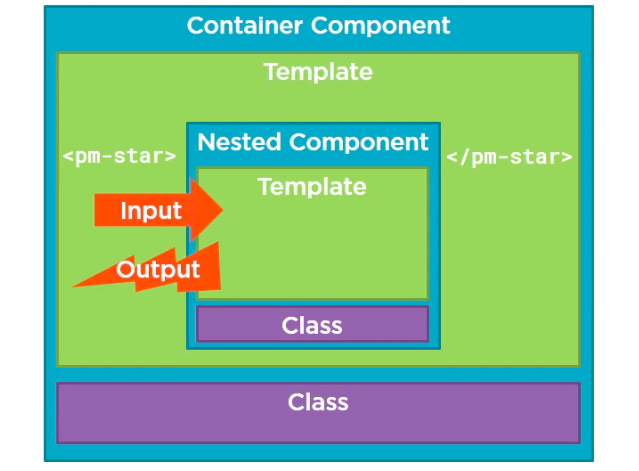
- Components are completely encapsulated and can then define inputs (property with
@Inputdecorator) and outputs (raise event using@Output) for them to pass data back and forth - EITHER nest a component using a directive
- OR use a component as a routing target
Input using Star component
- Create a new component with two properties
rating: numberandstarWidth: numberwhich is calculated based on the rating - Mark the
ratingproperty with the@Input()decorator i.e.@Input() rating: number - Implement the
OnChangesinterface so thestarWidthvalue can be updated any time the container changed the rating. - Add the
ngOnChangesmethod and implement the calculation ofstarWidth - Finally update the containing component to nest the star component and pass the input property:
<td><pm-star [rating]='product.starRating'></pm-star></td>
Output
@Output()decorator can be prepended to a property, but the type of the property must be an Event. The data to pass then becomes the Event payload.EventEmitter<T>is Angular’s event object e.g.EventEmitter<string>- e.g.
@Output() notify: EventEmitter<string> = new EventEmitter<string>(); - On the component HTML add the event:
<div (click)='onClick()'></div> - In the
StarComponentdefine theonClick()method e.g.this.notify.emit('clicked ...'); - This event will be raised to the containing component
- This event can then be received using
(notify)='onNotify($event);on the nested component HTML e.g.<pm-star [rating]='product.starRating' (notify)='onNotify($event)'></pm-star> - Lastly, implement the
onNotifymethod in the parent container
Services and Dependency Injection
- A Service is a class with a focused purpose independent of any component - provide shared data or cross cutting concerns like logging
- Angular DI container Injector creates singletons - since this instance is shared, any data or logic is shared with all components
- There is a
Root Injectorcontainer available to all components - There is also an
Injectoravailable to each component (and its child or nested components) - in this case each instance of the component will get its own instance of the service - How its registered depends on which Injector is used
- if it is the root injector, this can be specified in the service itself by using the
providedIn: 'rootproperty on the@Injectible()decorator - in a single component use the
providersproperty of the@Componentdecorator i.e.providers: [ProductService] - NOTE previous to Angular 6 to register with root, it was registered using the
providerproperty of the rootNgModuleinapp.module.ts(new way is better for tree shaking)
- if it is the root injector, this can be specified in the service itself by using the
Retrieving Data Using HTTP
Observables
Reactive extensions (RxJS) represent a data sequence as an observable sequence, “an observable”.
-
An array with items which arrive asynchronously over time
-
Can
subscribeto receive notifications:- when new items arrive:
next - there is no more data:
complete - when an error occurs:
error
- when new items arrive:
-
Full flow is:
- Call http get (nothing sent yet)
- http get returns an Observable which will emit notifications
- Subscribe to the Observable and the get request is now sent
- Response is returned
- The Observable emits a
nextevent - Process the emitted response (with http get the entire response is delivered as a single item)
-
Operators transform the source data in some way, and process each value as it comes e.g.
map,filter,take,merge -
e.g. multiple each value by 10:
map(x => 10 * x) -
See https://rxmarbles.com for “marble diagrams” of Rx Observables
-
Variables holding observables have a
$suffix by convention e.g.source$: Observable<number> = range(0, 10) -
pipe()the values through any observable operators -
subscribe()to receive values - no values will be emitted unless subscribed to, so this is KEY -
unsubscribe()at the end
const source$: Observable<number> = range(0,10); // sample of data
source$.pipe(
  map(x => x * 3),
  filter(x => x % 2 == 0)
).subscribe(x => console.log(x));
Promise vs Observable
| Promise | Observable |
|---|---|
| Provides a single future value | Emits multiple values over time |
| Lazy | Not lazy |
| Not cancellable | Cancellable - by unsubscribing |
| - | Supports map, filter, reduce and similar operators |
Exception Handling
Many things can go wrong when communicating with a backend service e.g. invalid request, lost connection. Two observable operators to help with exception handling are tap and catchError
tapenables looking at the values in the stream without transforming - useful for loggingcatchErrorcatches any errors
getProducts(): Observable<IProduct[]> {
  return this.http.get<IProduct[]>(this.productUrl).pipe(
    tap(data => console.log('All: ' + JSON.stringify(data))),
    catchError(this.handleError)
  );
}

private handleError(err: HttpErrorResponse) {
 ... // log to remote logging; throw to calling code etc
 let errorMessage = '';
 if (err.error instanceOf ErrorEvent) {
   errorMessage = `An error occurred: ${err.error.message}`;
 } else {
   errorMessage = `Server return code: ${err.status}, error message is: ${err.message}`;
 }
 console.log(errorMessage);
 return throwError(() => errorMessage);
}
Subscribing to an Observable
- Need to subscribe to get values using
subscribe() - Optionally takes an
Observerobject which is comprised of 3 functions, a next function, an error function and a complete function e.g.subscribe({ nextFunc, errorFunc, completeFunc})(where the functions can be expressed inline using => syntax) - HTTP calls are single async operations so the value emitted will be one item, an array
- Complete function is rarely used with HTTP requests, since they automatically complete after emitting the single response
this.productService.getProducts().subscribe({
  next: p => this.products = p,
  error: err => this.errorMessage = err
});
subscribe()returns an object which can be used to unsubscribe and cancel the call if necessary. It is good practice to save the subscription in a class variable and callunsubscribe()inngOnDestroy
ngOnDestroy(): void {
  this.sub && this.sub.unsubscribe();
}
Navigation and Routing Basics
- Configure a route for each component which wants to be displayed in the SPA
- Menus link to the various options, user clicks on a menu, activate the route
- Achieved via
routerLinkdirective e.g.<a routerLink='/products'>Products</a>(uses HTML5 style URLs and therefore have to configure web server to perform URL rewriting - hash style routing is also possible e.g. https://site/#/products - this DOESN’T require URL rewriting) - Routing is component based
- An angular application has ONE router, managed by angular’s router service
- The external
RouterModuleprovides the router service - import it and add it to the array of modules - Call the
RouterModule’sforRoot()method to register your routes - Use
RouterModule.forRoot([], {useHash: true})to use the hash based routing - Example route definitions:
[
  { path: 'products',  component: ProductListComponent },
  { path: 'products/:id', component: ProductDetailComponent },
  { path: 'welcome', component: WelcomeComponent },
  { path: '', redirectTo: 'welcome', pathMatch: 'full' },
  { path: '**', component: PageNotFoundComponent } // no other routes match
]
- First match win strategy when matching routes
- Don’t use forward slashes at the beginning (why??!)
Configuring routes
- Set up a
basetag in the index.html e.g.<base href="/"> - Add the
RouterModulein the root app module - Configure routes on the import by calling
RouterModule.forRoot([])and passing in the list of routes - Add a menu and use routerLink directives bound to template expressions returning link parameter arrays e.g.
<a [routerLink]="['/welcome']">Home</a>- the first element is the route, can also add optional route params
- NOTE: can also use the shorthand:
<a routerLink="/welcome">Home</a>
- Add the
<router-outlet></router-outlet>directive to the host component template - Can remove “selectors” for routed components (only required for nested components)
Navigation and Routing Additional Techniques
-
Two different ways to get parameters from
ActivatedRoute- snapshot or observable- Use the snapshot approach if only initial value of a parameter is needed e.g.
this.route.snapshot.paramMap.get('id') - Use the observable approach if you were navigating to the same component but using a new parameter e.g. a next button to get the next product details
- Use the snapshot approach if only initial value of a parameter is needed e.g.
-
Can route programatically using the
Routerservice. Inject it into the component required, and then call thenavigate()method e.g.this.route.navigate(['/products'])
Handling nulls or undefined
Either use ngIf in the template e.g. *ngIf="product" OR just use the ? safe navigation operator
Guards
- Use guards (which are actually just services) to protect access to e.g. admin only or to ensure a user doesn’t navigate away from a page before saving, or simply for validating parameters for a route e.g.
/products/1 - Several guards include:
CanActivate- guard navigation TO a routeCanDeactivate- guard navigation FROM a routeResolve- prefetch data before activating a route
CanLoad- prevent async routing
- Create a class for the guard service e.g.
ProductDetailsGuardwhich implements the interface for the desired guard (ng generate guard [name]) - Add details of the class to the route config e.g.
{ path: 'products/:id', component: ProductDetailsComponent, canActivate: [ProductDetailsGuard] }
Angular Modules
-
An Angular Module is a class with an
NgModuledecorator -
It can aggregate classes from other modules and reexport them conveniently e.g.
BrowserModule,HttpClientModuleandRouterModule -
Modules can be loaded eagerly at application start or lazy loaded asynchronously by the router (discussed in the Angular Routing course)
-
Modules declare ALL components, directives and pipes it manages
- each of these belong to an angular module
-
An Angular Module bootstraps our root application component, defining the component needed to display the first template
-
Modules import and export artefacts from and to other modules
- exports components, directives, pipes and also other modules
- imports other modules
-
Modules register service providers with the injector
-
Essentially an Angular Module provides a template resolution environment for each component that belongs to the module, so that each piece of syntax used in the template has the corresponding module imported
Bootstrap Array
- By convention the root module is called
AppModule AppModulebootstrapsAppComponentvia a directive in index.html e.g.<pm-root></pm-root>AppModule’s@NgModule()decorator contains abootstrapproperty which has an array of components to bootstrap e.g.[AppComponent]- The bootstrap array should only be used in the root application module
- It must contain at least one component
Declarations Array
- Define the components which belong to this module
- Each component, directive and pipe has must belong to one and only one module
- Only add components, directives and pipes to this array - don’t add other classes, services or modules
- Components, directives and pipes are private to this module by default
- An angular module provides the template resolution environments for its components templates
Exports Array
- Share a modules components, directives and pipes with other modules by adding them to the
exportsarray - Can re-export system Angular modules e.g.
HttpModule - Can re-export 3rd party Angular modules e.g. Material Design (https://material.angular.io)
- Can re-export the app’s own modules
- Can re-export something without importing it first e.g. our
SharedModuleexports theFormsModule- any other module which importsSharedModulewill automatically have access tongModel - Never export a service - they are added to the root application injector - then available to ANY class in the application
Imports Array
- Import supporting modules that export components, directives or pipes which this module needs
- Imports are NOT inherited unless those imports are re-exported. So if
SharedModuleimported theFormsModuleso thatngModulecan be used in theStarComponent, ifSharedModulewas imported byAppModule, the component templates inAppModuledo NOT get access tongModuleby default. IfSharedModuleadditionally exported theFormsModuleTHEN they would. - Also import any modules with services which are needed e.g.
HttpClientModule- usually this is done inAppModuleso these services are registered one time when the application is initialized
Providers Array
- Originally used to register services for the application BUT NO LONGER RECOMMENDED
- Instead (from Angular 6) use the
providedInproperty of the service itself - Notes on the Providers array (for legacy code):
- All services in the providers array of a given module are registered at the ROOT (not just with that module)
- If you want to ensure that service is local, register it with the providers array of a component instead
- Lazy loaded services are different
- Don’t add services to a shared module’s providers array (for reasons above) - instead consider creating a
CoreModuleand importing this ONCE if you want to separate in this way
Reorganising
- Create new module file for
FeatureModule - Move component declarations from
AppModuletoFeatureModule - Export any components used in other modules
- Import other modules required e.g.
FormsModule,RouterModule(and tidy up imports arrays inAppModuleif no longer used) - IMPORTANT: only import
BrowserModuleonce in theAppModule, for all other modules importCommonModuleinstead which is exported byBrowserModulefor thengIfetc directives - Move any feature specific routes using
forChildrather thanforRoot(onlyforRootregisters the service which is only needed once)
Building, Testing, and Deploying with the CLI
The CLI is design to help develop, run tests and deploy the application
- CLI is usually installed twice
- Global one which is up to date and which can be used to create new applications with the latest version
- Local one to each project
ng update
Gives commands to update angular, will temporarily update the ng CLI prior to then analysing the code
ng new
src/environmentssets up the build environmentsfavicon.icofeel free to replacekarma.configsets up karma, a JavaScript test runner - will use for unit testsmain.tsbootstraps the application (shouldn’t need to modify)polyfills.tsaids in supporting both evergreen and older browsers by removing commentstest.tssets up for testingtsconfig.*for TypeScript configurationtsconfig.app.jsoncompiles the code files - extendstsconfig.jsontsconfig.spec.jsoncompiles the test specs - also extendstsconfig.json
ng new --helpto see all the options
ng serve
The CLI launches a development server and listens on port 4200. Compiler is in watch mode and watches for any changes. Files are bundled into memory and are NOT available on disk. ng serve --help lists all the various options e.g. specify a different port.
ng generate
Uses schematics for code generation. Can generate the following using ng g [initial letter]
- class
cl; component; directive; enum, guard, interface, module, pipe, service
ng test / ng e2e
Builds the application, launches the browser and executes the karma test runner. The test runner runs in watch mode. The e2e tests use protractor and also launches the browser.
ng build
Outputs two sets of files for ES5 as well as ES2015. The applications has both sets of files and the browser downloads the appropriate set. Differential loading. The build process creates a dist folder with the actual bundles.
Also need to:
- minify the code
- tree shaking
- precompile the templates using the AOT compilers
Use ng build. Now the files have a hash as part of the file name - cache busting. By default no map files are generated. Use ng build --help to check out the options. e.g. -base-href to have a different root path.
Final Words
- Install the Angular Language Service extension for VS code
- Implement lazy loading for improved load performance - see the Angular Routing course
- Learn Observables - see the RxJS in Angular: Reactive Development course
- Use the Angular DevTools chrome extension
- Add ESLint using
ng add @angular-eslint/schematics - Angular Component Communication - patterns for passing data between components
- Angular Fundamentals - more in depth intermediate topics
- ← Previous
Terraform: Getting Started - Azure - Next →
Pluralsight: C# Generics